Does Trust.Zone VPN support Chromebook? Yes, it does. Trust.Zone VPN supports OpenVPN and L2TP compatible devices like Chromebook, DD-WRT Routers, Wi-Fi Routers and many others. Here is a guide how to install Trust.Zone VPN on Chromebook.
You can connect to a private network, such as a network at your work or school, using a Virtual Private Network (VPN) connection. You can use some types of VPNs on your Chromebook without installing any software.

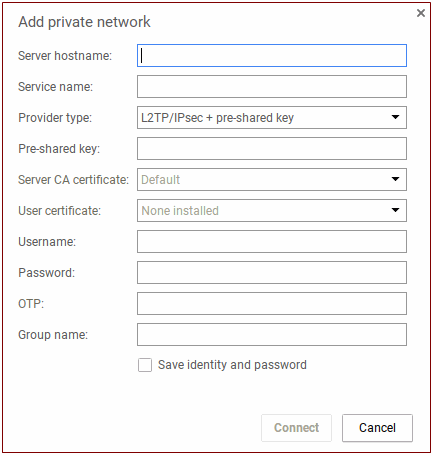
Server hostname: The name of the server you need to connect with to access your VPN. This can either be the IP address or the full server hostname (see image2)Fill out the fields. Take corresponding values (you need to log in first) here
Service name: This can be anything you want to name this connection. For example: "TrustZone VPN."
Provider type: If you use a passphrase or key besides your personal password to connect to your VPN, select L2TP/IPsec + Pre-shared key. If you use certificates that your administrator gives you, select L2TP/IPsec + User certificate.
Pre-shared key: This key isn't your personal password, but a passphrase or key used to connect to the VPN.
Server CA certificate: Select your installed server VPN certificate from the list.
User certificate: Select your installed user VPN certificate from the list. If you don't have any certificates installed, you'll see an error message. To install a certificate, see the instructions below.
Username: Your VPN credentials.
Password: Your VPN credentials.
OTP: If you have an OTP card or VPN token that generates one-time passwords, generate a password and enter it here.
Group name: The name of the VPN setup, if applicable.
Click Connect.
Download your server certificate authority. Take it under 'CA certificate files' (see image2) on Trust.Zone setup page.
Open a new tab in Chrome.
In the address bar, enter
chrome://settings/certificates
Click the Authorities tab.
Press the Import button and choose the X.509 certificate authority file, which is usually a file with a .pem, .der, .crt, or .p7b extension.
In the box that appears, fill out the information on how this certificate authority should be trusted. None of these trust settings need to be enabled, so we recommend that you leave these unchecked.
The certificate will open and install itself on your Chromebook.
Download your user certificate. Take it under 'Client certificate files' (see image 2) on Trust.Zone setup page.Doesn't help? Read official recommendations for intalling VPN on chromebook guide or contact us.
Open a new tab in Chrome.
In the address bar, enter
chrome://settings/certificates
Click the Your Certificates tab.
If you have a .pfx or .p12 file to import, click the Import and Bind to Device button.
In the box that opens, select the certificate file and click Open.
When prompted, enter the password for your certificate. If you don't know the password, contact your network administrator.
The certificate will open and install itself on your Chrome device.